SOLID principles
The SOLID design principles, articulated by Robert “Uncle Bob” Martin, are five principles that provide a good foundation for sound application design. The five principles are:
- S (Single Responsibility Principle)
- O (Open/Closed Principle)
- L (Liskov Substitution Principle)
- I (Interface Segregation Principle)
- D (Dependency Inversion Principle)
Single Responsibility Principle
A class (or unit of code) should have one responsibility.
設計一個類別,所有的實作應只為用來解決一個特定意圖(需求) 而如果為了解決這個需求,而延伸出其它的需求與實作,應該把這些工作交給其它類別。
|
1 2 3 4 5 6 7 8 9 |
// MVC class Controller {} class Model {} class View {} // In this case, we want to validate something before storing it. // Don't try to validate anything directly in Controller, Model or View ...etc. It will make them dirty. // Just make Validation class and use it in those classes. class Validation {} |
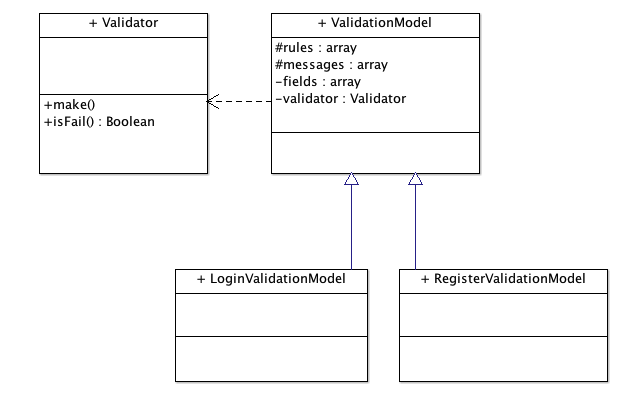
Open/Closed Principle
A class should be open for extension but closed for modification. You can extend a class or implement and interface, but you should not be able to modify a class directly. This means you should extend a class and use the new extension rather than change a class directly. Additionally, this means setting class attributes and methods as private or protected properly so they cannot be modified by external code.
一個類別應能被很有彈性地擴充,而不是直接修改其自身來解決新的意圖(需求)。以此原則來決定這個類別的屬性和方法該怎麼被限制,或該開放什麼?
|
1 2 3 4 5 6 7 8 9 10 11 12 13 14 15 16 17 18 19 20 21 22 23 24 25 26 27 28 29 30 31 32 33 34 35 36 37 38 |
class ValidationModel { protected $rules; protected $messages; private $fields; private $validator; public function __construct( array $attributes = array() ) { $this->fields = $attributes; } public function passes() { $this->validator = Validator::make( $this->rules, $this->fields, $this->messages ); if( $this->validator->isFail() ) { return $this->validator->messages()->first(); } return true; } } class LoginValidationModel extends ValidationModel { protected $rules = array( 'id' => 'required|min:5', 'password' => 'required|min:8' ); protected $messages = array( 'id.required' => 'ID is required for login.', 'id.min' => 'ID must be at least five characters.' ); } class RegisterValidationModel extends ValidationModel { // ... } |
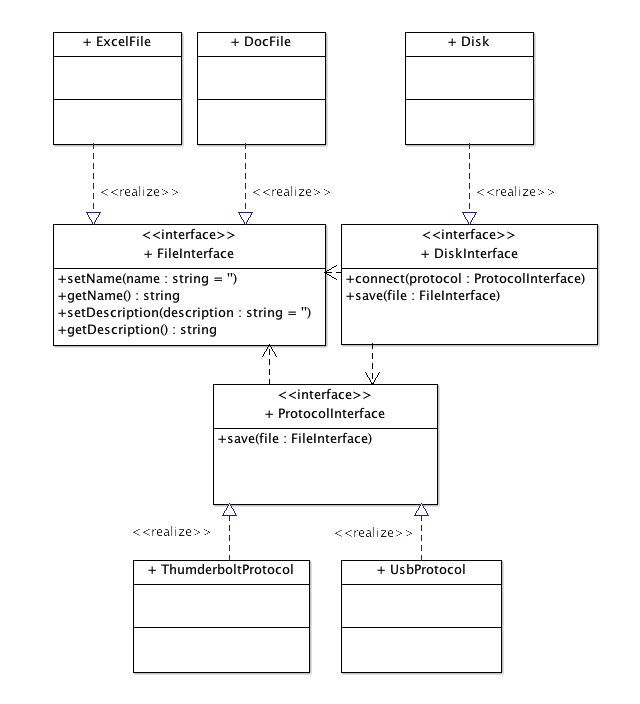
Liskov Substitution Principle
Objects in a program should be replaceable with instances of their subtypes without altering the correctness of that program. In PHP, this often means creating interfaces for your code to implement. You can then change (switch-out) implementations of the interfaces, Doing so should be possible without having to change how your application code interacts with the implementation. The interface serves as a contract, guaranteeing that certain methods will be available.
每當我們在一個類別引用了其它類別時,多思考如何往後如何切換或取代這件事,之後如果不用到它,會有什麼影響?如何讓更換這件事不費力? 經驗上,我們往往會遇到一些被設計用來解決相同需求(購物這個需求),但有各自實作方式(Paypal, Stripe …等支付方法)的情況,我們可以利用界面(interface),定義一個大家共同遵循的規範(我們都應該有購買這個行為),這個概念如同讓這些類別簽定了一個契約(Contract),以確保都將一定會實行哪些行為。如此,我們只要專注那些行為在流程上的安排,不管現在這個實行的對象為何都不致於讓流程出錯,甚致隨時可以將其取代成別的也簽定契約的類別。
|
1 2 3 4 5 6 7 8 9 10 11 12 13 14 15 16 17 18 19 20 21 22 23 24 25 26 27 28 29 30 31 32 33 34 35 36 37 38 39 40 41 42 43 44 45 46 47 48 49 50 51 52 53 54 55 56 57 58 59 60 61 62 63 64 65 66 67 68 |
interface FileInterface { public function setName( $name = '' ); public function getName(); public function setDescription( $description = '' ); public function getDescription(); } interface DiskInterface { public function connect( ProtocolInterface $protocol ); public function save( FileInterface $file ); } interface ProtocolInterface { public function save( FileInterface $file ); } class UsbProtocol implements ProtocolInterface { public function save( FileInterface $file) { $file->setDescription( $file->getName(). ' was saved via usb protocol.'); } } class ThumderboltProtocol implements ProtocolInterface { public function save( FileInterface $file) { $file->setDescription( $file->getName(). ' was saved via thumderbolt protocol.'); } } class Disk implements DiskInterface { protected $protocol; public function connect( ProtocolInterface $protocol ) { $this->protocol = $protocol; } public function save( FileInterface $file ) { $this->protocol->save( $file ); } } class File implements FileInterface { protected $filename = 'undefined'; protected $ext = ''; protected $description = ''; public function __construct() { $this->filename = $this->filename.$this->ext; } public function setName( $name = '' ) { $this->filename = $name . $this->ext; } public function getName() { return $this->filename; } public function setDescription( $description = '' ) { $this->description = $description; } public function getDescription() { return $this->description; } } class DocFile extends File { protected $ext = '.docx'; } class ExcelFile extends File { protected $ext = '.xls'; } $disk = new Disk(); $disk->connect( new ThumderboltProtocol ); $file = new DocFile(); $disk->save( $file ); |
Interface Segregation Principle
Many client-specific interfaces are better than one general-purpose interface. In general, it’s preferable to create an interface and implement it many times over than create a general-purpose class which attempts to work in all situations.
因為在程式語言中,一旦行為(method)在界面(interface)中被定義,在類別中就要嚴格地去實作。所以應該避免用一個很概廓性的界面讓類別去實作很多不必要的行為。 就設計的角度來看,就是思考如何拆分行為的關連性這件事。
|
1 2 3 4 5 6 7 8 9 10 11 12 13 14 15 16 17 18 19 20 21 |
interface isFlyable() { public function fly(); } interface isWalkable() { public function walk(); } interface isSwimable() { public function swim(); } class Starck implements isWalkable { public function walk() {} } class Pigeon implements isFlyable, isWalkable { public function fly() {} public function walk() {} } class Jessie implements isWalkable, isSwimable { public function walk() {} public function swim() {} } |
Dependency Inversion Principle
One should depend upon abstractions rather than concrete classes. You should define class dependencies as an interface rather than a concrete class. This allows you to switch an implementation of the interface out without having to change the class using the dependency.
This principle states that high-level code should not depend on low-level code, and that abstractions should not depend upon details.
依賴界面的關係比依賴類別來得更好,目的是希望在一個系統中元件之間相互依賴的程度(耦合性)盡可能的降低,以避免牽一髮動全身的情況發生。 以這個原則來說,最常見的情況,就是該怎麼設計如何切換資料來源的機制。資料的存取可能是在 MySQL, NoSQL, 甚至是 Memory,我們如何在不影響主程式太多的情況下改變來源?
舉例來說
|
1 2 3 4 5 6 7 8 9 10 11 |
class DbMysql { public function getAll( $target ) { ... } } class Me { public fuunction getAllUsersFromMySql() { $db = new DbMysql; return $db->getAll('user'); } } $me = new Me; $me->getAllUsersFromMySql(); |
這段程式大概是長得像這樣的句子:
「我要去MySQL檔案庫查詢使用者名單」。
這是一個耦合性高的句子,意即我們想要稍微改變一下行為,整個「」裡的文字都要變動,所以我們稍微調整一下:
我要去 MySQL 檔案庫「查詢使用者名單」。
MySQL 檔案庫為 來源地, 而 查詢使用者名單 為動作。
|
1 2 3 4 5 6 7 8 9 10 |
class DbMysql { public function getAll( $target ) { ... } } class Me { public fuunction getAllUsersFrom(DbMysql $db) { return $db->getAll('user'); } } $me = new Me; $me->getAllUsersFrom( new DbMysql ); |
雖然我把來源地區隔開來,但實際上如果我改去 NoSQL 檔案庫,那麼這個句子還是會出錯,因為我們明確指出我們要到 MySql 檔案庫,該用什麼句子來表達才不會有問題呢?
答案是使用統稱:「我」要去「檔案庫」「查詢使用者名單」。
|
1 2 3 4 5 6 7 8 9 10 11 12 13 14 15 16 17 18 19 |
interface RepositoryInterface { public getAll( $target ); } class MySqlRepository implements RepositoryInterface { public getAll( $target ) { ... } } class NoSqlRepository implements RepositoryInterface { public getAll( $target ) { ... } } class Me { public function getAllUsersFrom( RepositoryInterface $repository ) { return $repository->getAll('user'); } } $me = new Me; // MySql $me->getAllUsersFrom( new MySqlRepository ); // NoSql $me->getAllUsersFrom( new NoSqlRepository ); |
白話一點就是叫我們講話講得愈模糊愈好,就像是如果我跟一個以上的女朋友同時在交往,每一位打電話來我都叫她「親愛的」,這樣就可以避免叫錯人的情況啦。
|
1 2 3 4 5 6 7 8 9 10 11 12 13 14 15 16 17 18 19 20 21 22 23 24 25 26 27 28 29 30 31 32 33 34 35 36 37 38 39 40 41 42 43 |
interface UserInterface { public function all() {}; } class EloquentUserRepository implements UserInterface { public function all() { return User::all()->toArray(); } } class DbUserRepository implements UserInterface { public function all() { return DB::table('users')->get(); } } class MemoryUserRepository implements UserInterface { public function all() { return Mem::key('users')->getAll(); } } class BaseController { portected $users; } class Controller extends BaseController { public function __construct( UserInterface $users ) { $this->users = $users; } public function getUsers() { $this->users->all(); } } // get all users via Eloquent Model $controller = new Controller( new EloquentUserRepository ); // get all users via Database Query Builder $controller = new Controller( new DbUserRepository ); // get all users from memory $controller = new Controller( new MemoryUserRepository ); // in laravel, you can use App::bind for switching dependencies at runtime App::bind( 'UserInterface', function() { return new EloquentUserRepository( ... ); }); |
|
1 2 3 4 5 6 7 8 9 10 11 12 13 14 15 16 17 18 19 20 21 22 23 24 25 26 27 28 29 30 31 32 33 34 35 36 37 38 39 40 41 42 43 44 45 46 47 48 49 50 51 52 53 54 55 56 57 58 59 60 61 62 63 64 65 66 67 68 69 70 71 72 73 74 |
interface PaymentInterface { public function checkout(); } interface PaymentPaypalInterface extends PaymentInterface {}; interface PaymentStripeInterface extends PaymentInterface {}; class PaymentController extends BaseController { protected $payment; } class PaypalPaymentController extends PaymentController { public function __construct( PaymentPaypalInterface $payment) { $this->payment = $payment; } } class StripPaymentController extends PaymentController { public function __construct( PaymentStripeInterface $payment) { $this->payment = $payment; } } class DynPaymentController extends PaymentController { public function __construct( PaymentInterface $payment ) { $this->payment = $payment; } } class PaypalPayment implements PaymentInterface { public $name = 'paypal'; public function checkout() { return 'paypal checkout'; } } class StripePayment implements PaymentInterface { public $name = 'stripe'; public function checkout() { return 'stripe checkout'; } } App::bind('PaypalRepository', 'PaypalPayment'); App::bind('StripeRepository', 'StripePayment'); App::bind('PaymentPaypalInterface', function() { // ... return new PaypalRepository(); }); App::bind('PaymentStripeInterface', function() { // ... return new StripeRepository(); }); App::bind('PaymentInterface', function() { $user = User::find(1); if( $user->payment == 'paypal' ) { return App::make('PaymentPaypalInterface'); }else{ return App::make('PaymentStripeInterface'); } }); |
|
1 2 3 4 5 6 7 8 9 10 11 12 13 14 15 |
<?php namespace Database; class Database { protected $adapter; public function __construct(AdapterInterface $adapter) { $this->adapter = $adapter; } } interface AdapterInterface {} class MysqlAdapter implements AdapterInterface {} |