»

Laravel 4 Tutorial Part 2 – Migrations and Artisan

Log — Tags: , — Posted by Starck on March 31, 2013

Migrations

Migrations Installation

migrate:install : it will crate a migrations table for record any changes of database.

Making a new migration record

migrate:make (create|remove)_tablename_table

The --table and --create options may also be used to indicate the name of the table, and whether the migration will be creating a new table:

$ php artisan migrate:make create_authors_table --table=authors --create

Running All Outstanding Migrations

$ php artisan migrate

To seed your database, you may use the db:seed command on the Artisan CLI:

$ php artisan db:seed

Rollback all migrations and run them all again

$ php artisan migrate:refresh --seed

Artisan

Check routes status: $ php artisan routes

Clear auto-load files: $ php artisan clear-compiled

Re-generate auto-load files: $ php artisan dump-autoload

讓 Markdown-On-Save-Improved 支援 Github 的 Fenced code blocks

Log — Tags: , , — Posted by Starck on March 30, 2013

修改 markdown-on-save.php:

這是搭配 Crayon WP-Plugin, 如果遇到原始碼有 </pre> 的問題, 可以轉成 &lt; (<) 和 &gt; (>), 再把 crayon 的 decode 設為 true.

另外有個值得注意的點, 換行符號我是用雙引號來轉換 \n

Fork it on Github

Bash Prompt and ANSI Color

Log — Tags: , , — Posted by Starck on March 29, 2013

Bash Setting

Prompt

只要設定 PS1 這個環境變數就可以修改在 Terminal 的提示文字, 通常會在 home 目錄中的 .bashrc 找到定義

export PS1=""

可以使用的 prompt 變數如下:

  • \d : 可顯示出『星期 月 日』的日期格式,如:”Mon Feb 2″
  • \H : 完整的主機名稱
  • \h : 僅取主機名稱在第一個小數點之前的名字
  • \t : 顯示時間,為 24 小時格式的『HH:MM:SS』
  • \T : 顯示時間,為 12 小時格式的『HH:MM:SS』
  • \A : 顯示時間,為 24 小時格式的『HH:MM』
  • \@ : 顯示時間,為 12 小時格式的『am/pm』樣式
  • \u : 目前使用者的帳號名稱,如『root』;
  • \v : BASH 的版本資訊
  • \w : 完整的工作目錄名稱,由根目錄寫起的目錄名稱。但 home 目錄會以 ~ 取代;
  • \W : 利用 basename 函數取得工作目錄名稱,所以僅會列出最後一個目錄名。
  • \# : 下達的第幾個指令。
  • \$ : 提示字元,如果是 root 時,提示字元為 # ,否則就是 $ 囉~

ANSI Color

  • \e[ or \033[ : 代表顏色宣告的開始
  • x;ym : x,y 為顏色值
  • \e[m or \033[m : 顏色宣告結束

顏色值可以參考下面的對照表:

reference

ANSI 256 Color

如果要用到 ANSI 256 color, 可以先下載 colortest 了解想要的顏色編號.

  • \e[38;5; or \033[38;5; : 顏色宣告
  • xm : x 為顏色編號
  • \e[m or \033[m : 顏色宣告結束

我目前的 PS1 設定如下

export PS1="★ \u [\033[38;5;148m \W \033[m] \$ "

export PS1="\e[0;96m☁ \e[m \u [\033[38;5;148m \W \033[m] \$ "

.

Upgrading PHP on MacOS

Log — Tags: , , , — Posted by Starck on March 29, 2013

所需工具

使用 Brew 讓在 MacOS 安裝管理套件變得容易許多, 而 HomeBrew-PHP 則是讓你在 MacOS 上安裝 PHP 和管理 extensions 的 Brew 套件.

Brew

安裝 Brew:

ruby -e "$(curl -fsSL https://raw.github.com/mxcl/homebrew/go)"

如果之前已經安裝過 Brew, 依據習慣, 我會將 Brew 更新到最後的版本:

brew update

brew upgrade

Installation

Tap the homebrew/dupes repository into your brew installation:

brew tap homebrew/dupes

Tap the repository into your brew installation:

brew tap josegonzalez/homebrew-php

安裝參數說明

brew options php54

安裝 php 5.4

brew install php54

安裝時可能會出現的問題

jpeg8-d:

jpeg8-d is already installed, it's just not linked
    Could not symlink file: /usr/local/Cellar/jpeg/8d/bin/wrjpgcom
    Target /usr/local/bin/wrjpgcom already exists. You may need to delete it.
    To force the link and delete this file, do:
    brew link --overwrite formula_name

解法: brew link --overwrite jpeg

reference

Apache httpd.conf 設定

先檢查 /usr/local/Cellar/php54/ 下的 php 版本號是多少, 例如: 5.4.12

** Update 2013-08-07 **

在 Moutain Lion Server 下, 修改 php module 讀取路徑要到 /Library/Server/Web/Config/apache2/httpd_server_app.conf

** Update 2013-10-26 **

After updating Mavericks Server, please also upgrade to the latest Xcode and make sure you re-install Command-line Tools: xcode-select --install

Edit /Library/Server/Web/Config/apache2/httpd_server_app.conf:

如果使用 FPM, 請在 Terminal 下達:

Command-line

If you would like to swap the PHP you use on the command line, you should update the $PATH variable in either your .bashrc or .bash_profile:

[MacOS] mysql.sock error

Log — Tags: , — Posted by Starck on March 28, 2013

今天在使用 Terminal 連線到本機 MySQL 時發生錯誤:

ERROR 2002 (HY000): Can’t connect to local MySQL server through socket ‘/tmp/mysql.sock’ (2)

因為平常使用 phpMyAdmin 都是正常的, 所以不確定這個情況是什麼時候開始和什麼原因造成的. 查看 /etc/my.cnf, 確認 mysql.sock 是設在 /var/mysql/mysql.sock(不知道為什麼用 mysql 指令時它會跑去透過 /tmp/mysql.sock) , 沒時間處理這個問題, 所以先用 symbolic link 的方式解決.

$ ln -s /var/mysql/mysql.sock /tmp/mysql.sock

Using CodeKit with Foundation and Bootstrap

Coding — Tags: , , , , — Posted by Starck on March 28, 2013

需要軟體與 Framework

CodeKit

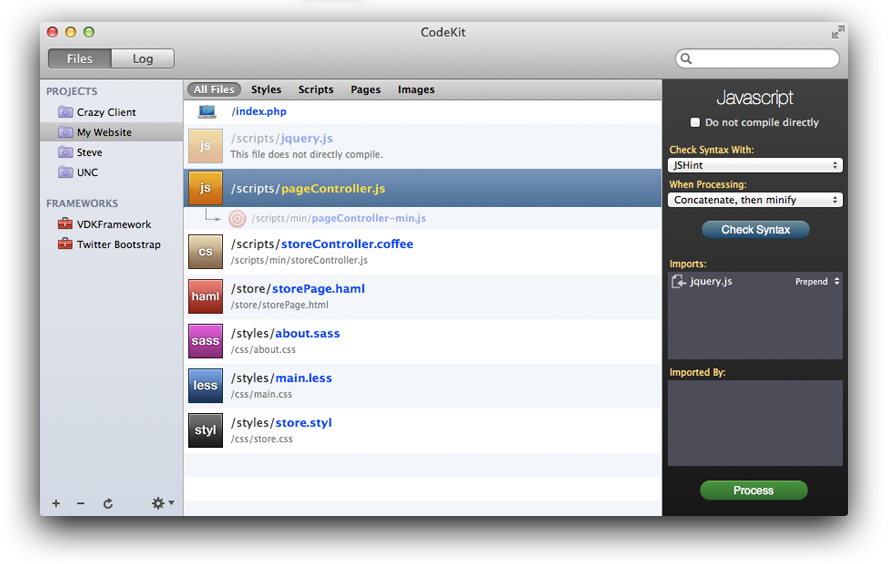
CodeKit Interface

Continue reading “Using CodeKit with Foundation and Bootstrap” »

Flat UI – Web Interface Kit

Design — Tags: , , , — Posted by Starck on March 28, 2013

除了 Twitter BootstrapZurb Foundation 之外, 我們現在又多了一種選擇 – Flat UI.

2013/04/08 update: 這是基於 Bootstrap 改了 CSS Style 的 theme.

Preview

Flat UI

Laravel 4 Tutorial Part 1 – Installation and Configuration

Coding — Tags: , — Posted by Starck on March 26, 2013

Laravel

根據官網的說法:

Laravel is a clean and classy framework for PHP web development. Freeing you from spaghetti code, Laravel helps you create wonderful applications using simple, expressive syntax.

Development should be a creative experience that you enjoy, not something that is painful. Enjoy the fresh air.

大略看了文件後,覺得跟 Ruby on Rails 的概念很接近,以下幾點特色很吸引我:

  • Artisan : command-line 的操作方式, 支持擴充指令
  • Autoloading : 採用 Composer 的 autoload 機制, 不用再一直忘了 require 了
  • Blade Template Engine : 簡單好用的模版引擎
  • Migration / Seeding : 資料庫的版本管理
  • Query Builder : 幾乎所有的 MVC Framework 都會有這樣的 SQL 操作類
  • Eloquent ORM / Auth : 直接就有 ORM 可以用! 並有一個簡單的 Authentication 機制
  • Dependency Injection
  • IoC Container

安裝

Get Laravel from Github

$ mkdir {project_folder}
$ cd {project_folder}
$ get clone git://github.com/laravel/laravel.git
$ git checkout develop

Laravel 從 4 開始就不再用舊有的 Bundle, 而採用 Composer 來作 packages 的管理與安裝.

下載 Composer

$ curl -sS https://getcomposer.org/installer | php

付予 Composer 可執行的權限

這時專案資料夾會有一個 composer.phar 的文件, 我習慣把它命名為 composer 並付予可執行的權限:

$ chmod +x ./composer.phar
$ mv composer.phar composer

安裝 Composer

$ composer install

安裝 Laravel 所需的 packages

$ composer update

到這裡如果都沒有發生任何錯誤, Laravel 4 就算安裝完成了.

開發工具

我個人偏好用 SublimeText 2 or Vim 來作為我開發的 IDE, 而基於 Laravel 我比較建議用 SublimeText, 因為有一個方便的 LaravelGenerator, 使用這個 Plugin 前需要安裝 Laravel-4-Generators.

安裝 LaravelGenerator SublimeText Plugin

在 SublimeText 中:

Command + Shift + p

出現提示後然後輸入:

install 選擇 Package Control: Install Package

接著輸入: LaravelGenerator 選擇我們要安裝的 Plugin

這樣我們就已經把 LaravelGenerator Plugin 裝進 SublimeText 了

安裝 Laravel-4-Generators Package

開啟專案根目錄下的 composer.json, 在 require 設定加入 "way/generators": "dev-master"

更新並下載所需的 packages

$ composer update

加入 Laravel 的 ServiceProvider

開啟 app/config/app.php

providers 中加上 'Way\Generators\GeneratorsServiceProvider', 讓 artisan 運行時自動載入所需的類別

檢查 Laravel-4-Generators 是否安裝成功

$ php artisan

如果出現訊息有包含以下資訊就代表 package 安裝成功了:

可以參考 Pro Workflow in Laravel and Sublime Text 中的影片教學.

設定

儲存區目錄權限設定

app/storage 這個資料夾裡所有文件和目錄都設為可寫入的權限:

$ chmod -R 777 ./app/storage/

在 Server 上因為我習慣上會把網站文件的群組設為 apache (CentOS) or www-data (Ubuntu), 再付予群組的寫入權限.

$ chown -R user:group ./app/storage
$ chmod -R g+x ./app/storage

環境設定

Laravel 的設定檔都統一放置在 app/config/ 裡, 而 Laravel 可以依據 HTTP host 來決定讀取不同的設定檔, 例如測試主機和正式主機的資料庫設定可能會有所不同.

設定檔預設就是用在 production 環境, 如果有特定的設定需要在 localhost 本機環境下作變動, 只要在 app/config/ 建立一個 local 資料夾, 並把設定檔放置其中即可, 例如 database.php.

example:

app/config/ - 放置正式上線的 production 設定
app/config/local/ - 放置本機環境的設定
app/config/testing/ - Unit Testing 用的設定

環境的定義請見 /bootstrap/start.php

Laravel 已經事先幫你定義好 local 的環境定義, 所以你只需把 your-machine-name 置換成你的電腦名稱或是 localhost.

Encryption Key

在編寫任何程式之前, 請先修改 app/config/app.phpkey (Encryption Key).

你也可以用 artisan 自動產生一組隨機文字的 key, 在這之前需要先將原本的 key 刪除:

接著在 Terminal 下達:

$ php artisan key:generate

最常用的 SublimeText Plugins 和 Key Bindings

Coding, Log — Tags: — Posted by Starck on March 26, 2013


Theme


Plugins

  • Emmet – 快速編寫 HTML/CSS 的方式

  • CTags

    在 Mac 下會有問題,需要修改設定檔:

    "command" : "ctags -R -f .tags"

    改成

    "command" : "/usr/local/bin/ctags -R -f .tags"

    就正常了

  • SFTP

    可以在 SublimeText 直接上傳文件到 Server, 還可以 diff 比較差異, 很好用。

  • Git

    這個不用說了吧,不過很少用,因為都直接在 Terminal 操作

  • CodeIntel

    提供自動化的 Navigate to Definition 和 Autocomplete, 但還沒有仔細去研究…

  • MarkdownPreview

    預覽 Markdown 語法的生成畫面, 可以 settings 裡將 parser engine 改成 github (預設為 default) 以支援 GitHub-flavored Markdown

  • HTMLPrettify

  • Javascript Beautify

manual format: Ctl+Alt+f

.

Key Bindings

  • cmd + p : Goto Anything
  • ctrl + cmd + p : Command Pattern
  • cmd + d : Multiple Selection 快速修改變數名稱
  • cmd + option + d : 移除整行文字
  • ctrl + cmd + : 整行文字上移
  • ctrl + cmd + : 整行文字下移
  • cmd + option + : 整行文字複製到下一行

2013-07-18 更新

CodeIntel:

For Mac OS X:

  • Jump to definition = Control+Click
  • Jump to definition = Control+Command+Alt+Up
  • Go back = Control+Command+Alt+Left
  • Manual CodeIntel = Control+Shift+space

2014-06-10 更新

Overwrite 模式切換

alt + cmd+ o


2013-06-18:

CodeIntel 需要建一個設定檔在 ~/.codeintel/config 或是 project_root/.codeintel/config:

在我的 Mac, 因為有用 Brew 重新編譯 PHP, 所以路徑應改為:

"php": '/usr/local/Cellar/php54/5.4.12/bin/php',

(c) 2024 Starck Lin | powered by WordPress