»

Chrome Extension – Secure Shell

Log — Posted by Starck on April 2, 2013

Secure Shell

這是一個可以讓你直接在 Chrome 瀏覽器 SSH 連線的 Chrome Extension

使用過後覺得還蠻好用的, 但因為切換視窗的習慣, 目前可能還是會用 iTerm, 但無論如何, 這是個不錯的 idea.

Secure Shell on Google Web Store.

改變字型

開啟 Chrome console, 執行下面的命令:

term_.prefs_.set('font-family', 'Monaco')

改變字體大小

term_.prefs_.set('font-size', '12')

Inspiration 2013-04-01

Design — Tags: — Posted by Starck on April 1, 2013


tumblr_mjzipnc2IT1qzcdbeo1_1280


Laravel 4 Tutorial Part 2 – Migrations and Artisan

Log — Tags: , — Posted by Starck on March 31, 2013

Migrations

Migrations Installation

migrate:install : it will crate a migrations table for record any changes of database.

Making a new migration record

migrate:make (create|remove)_tablename_table

The --table and --create options may also be used to indicate the name of the table, and whether the migration will be creating a new table:

$ php artisan migrate:make create_authors_table --table=authors --create

Running All Outstanding Migrations

$ php artisan migrate

To seed your database, you may use the db:seed command on the Artisan CLI:

$ php artisan db:seed

Rollback all migrations and run them all again

$ php artisan migrate:refresh --seed

Artisan

Check routes status: $ php artisan routes

Clear auto-load files: $ php artisan clear-compiled

Re-generate auto-load files: $ php artisan dump-autoload

讓 Markdown-On-Save-Improved 支援 Github 的 Fenced code blocks

Log — Tags: , , — Posted by Starck on March 30, 2013

修改 markdown-on-save.php:

這是搭配 Crayon WP-Plugin, 如果遇到原始碼有 </pre> 的問題, 可以轉成 &lt; (<) 和 &gt; (>), 再把 crayon 的 decode 設為 true.

另外有個值得注意的點, 換行符號我是用雙引號來轉換 \n

Fork it on Github

Bash Prompt and ANSI Color

Log — Tags: , , — Posted by Starck on March 29, 2013

Bash Setting

Prompt

只要設定 PS1 這個環境變數就可以修改在 Terminal 的提示文字, 通常會在 home 目錄中的 .bashrc 找到定義

export PS1=""

可以使用的 prompt 變數如下:

  • \d : 可顯示出『星期 月 日』的日期格式,如:”Mon Feb 2″
  • \H : 完整的主機名稱
  • \h : 僅取主機名稱在第一個小數點之前的名字
  • \t : 顯示時間,為 24 小時格式的『HH:MM:SS』
  • \T : 顯示時間,為 12 小時格式的『HH:MM:SS』
  • \A : 顯示時間,為 24 小時格式的『HH:MM』
  • \@ : 顯示時間,為 12 小時格式的『am/pm』樣式
  • \u : 目前使用者的帳號名稱,如『root』;
  • \v : BASH 的版本資訊
  • \w : 完整的工作目錄名稱,由根目錄寫起的目錄名稱。但 home 目錄會以 ~ 取代;
  • \W : 利用 basename 函數取得工作目錄名稱,所以僅會列出最後一個目錄名。
  • \# : 下達的第幾個指令。
  • \$ : 提示字元,如果是 root 時,提示字元為 # ,否則就是 $ 囉~

ANSI Color

  • \e[ or \033[ : 代表顏色宣告的開始
  • x;ym : x,y 為顏色值
  • \e[m or \033[m : 顏色宣告結束

顏色值可以參考下面的對照表:

reference

ANSI 256 Color

如果要用到 ANSI 256 color, 可以先下載 colortest 了解想要的顏色編號.

  • \e[38;5; or \033[38;5; : 顏色宣告
  • xm : x 為顏色編號
  • \e[m or \033[m : 顏色宣告結束

我目前的 PS1 設定如下

export PS1="★ \u [\033[38;5;148m \W \033[m] \$ "

export PS1="\e[0;96m☁ \e[m \u [\033[38;5;148m \W \033[m] \$ "

.

Upgrading PHP on MacOS

Log — Tags: , , , — Posted by Starck on March 29, 2013

所需工具

使用 Brew 讓在 MacOS 安裝管理套件變得容易許多, 而 HomeBrew-PHP 則是讓你在 MacOS 上安裝 PHP 和管理 extensions 的 Brew 套件.

Brew

安裝 Brew:

ruby -e "$(curl -fsSL https://raw.github.com/mxcl/homebrew/go)"

如果之前已經安裝過 Brew, 依據習慣, 我會將 Brew 更新到最後的版本:

brew update

brew upgrade

Installation

Tap the homebrew/dupes repository into your brew installation:

brew tap homebrew/dupes

Tap the repository into your brew installation:

brew tap josegonzalez/homebrew-php

安裝參數說明

brew options php54

安裝 php 5.4

brew install php54

安裝時可能會出現的問題

jpeg8-d:

jpeg8-d is already installed, it's just not linked
    Could not symlink file: /usr/local/Cellar/jpeg/8d/bin/wrjpgcom
    Target /usr/local/bin/wrjpgcom already exists. You may need to delete it.
    To force the link and delete this file, do:
    brew link --overwrite formula_name

解法: brew link --overwrite jpeg

reference

Apache httpd.conf 設定

先檢查 /usr/local/Cellar/php54/ 下的 php 版本號是多少, 例如: 5.4.12

** Update 2013-08-07 **

在 Moutain Lion Server 下, 修改 php module 讀取路徑要到 /Library/Server/Web/Config/apache2/httpd_server_app.conf

** Update 2013-10-26 **

After updating Mavericks Server, please also upgrade to the latest Xcode and make sure you re-install Command-line Tools: xcode-select --install

Edit /Library/Server/Web/Config/apache2/httpd_server_app.conf:

如果使用 FPM, 請在 Terminal 下達:

Command-line

If you would like to swap the PHP you use on the command line, you should update the $PATH variable in either your .bashrc or .bash_profile:

[MacOS] mysql.sock error

Log — Tags: , — Posted by Starck on March 28, 2013

今天在使用 Terminal 連線到本機 MySQL 時發生錯誤:

ERROR 2002 (HY000): Can’t connect to local MySQL server through socket ‘/tmp/mysql.sock’ (2)

因為平常使用 phpMyAdmin 都是正常的, 所以不確定這個情況是什麼時候開始和什麼原因造成的. 查看 /etc/my.cnf, 確認 mysql.sock 是設在 /var/mysql/mysql.sock(不知道為什麼用 mysql 指令時它會跑去透過 /tmp/mysql.sock) , 沒時間處理這個問題, 所以先用 symbolic link 的方式解決.

$ ln -s /var/mysql/mysql.sock /tmp/mysql.sock

Using CodeKit with Foundation and Bootstrap

Coding — Tags: , , , , — Posted by Starck on March 28, 2013

需要軟體與 Framework

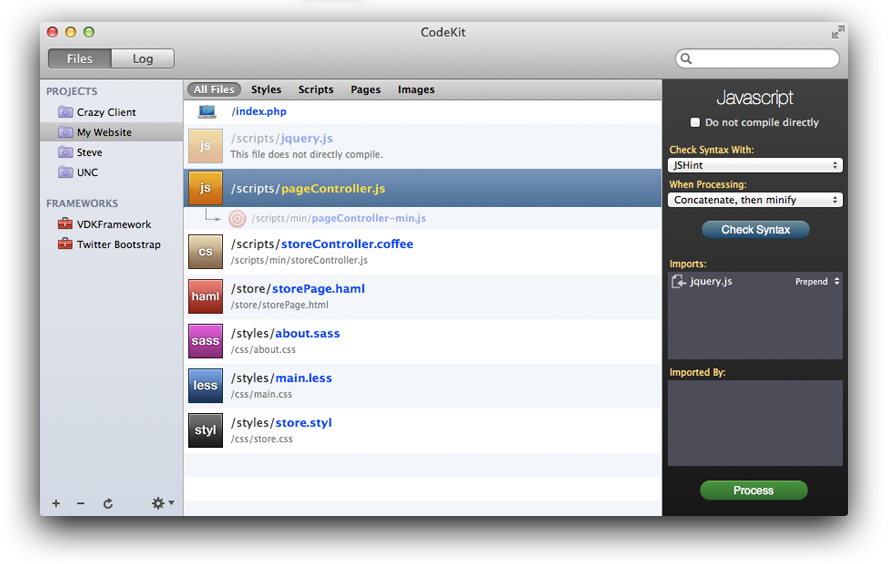
CodeKit

CodeKit Interface

Continue reading “Using CodeKit with Foundation and Bootstrap” »

Flat UI – Web Interface Kit

Design — Tags: , , , — Posted by Starck on March 28, 2013

除了 Twitter BootstrapZurb Foundation 之外, 我們現在又多了一種選擇 – Flat UI.

2013/04/08 update: 這是基於 Bootstrap 改了 CSS Style 的 theme.

Preview

Flat UI

Laravel 4 Tutorial Part 1 – Installation and Configuration

Coding — Tags: , — Posted by Starck on March 26, 2013

Laravel

根據官網的說法:

Laravel is a clean and classy framework for PHP web development. Freeing you from spaghetti code, Laravel helps you create wonderful applications using simple, expressive syntax.

Development should be a creative experience that you enjoy, not something that is painful. Enjoy the fresh air.

大略看了文件後,覺得跟 Ruby on Rails 的概念很接近,以下幾點特色很吸引我:

  • Artisan : command-line 的操作方式, 支持擴充指令
  • Autoloading : 採用 Composer 的 autoload 機制, 不用再一直忘了 require 了
  • Blade Template Engine : 簡單好用的模版引擎
  • Migration / Seeding : 資料庫的版本管理
  • Query Builder : 幾乎所有的 MVC Framework 都會有這樣的 SQL 操作類
  • Eloquent ORM / Auth : 直接就有 ORM 可以用! 並有一個簡單的 Authentication 機制
  • Dependency Injection
  • IoC Container

安裝

Get Laravel from Github

$ mkdir {project_folder}
$ cd {project_folder}
$ get clone git://github.com/laravel/laravel.git
$ git checkout develop

Laravel 從 4 開始就不再用舊有的 Bundle, 而採用 Composer 來作 packages 的管理與安裝.

下載 Composer

$ curl -sS https://getcomposer.org/installer | php

付予 Composer 可執行的權限

這時專案資料夾會有一個 composer.phar 的文件, 我習慣把它命名為 composer 並付予可執行的權限:

$ chmod +x ./composer.phar
$ mv composer.phar composer

安裝 Composer

$ composer install

安裝 Laravel 所需的 packages

$ composer update

到這裡如果都沒有發生任何錯誤, Laravel 4 就算安裝完成了.

開發工具

我個人偏好用 SublimeText 2 or Vim 來作為我開發的 IDE, 而基於 Laravel 我比較建議用 SublimeText, 因為有一個方便的 LaravelGenerator, 使用這個 Plugin 前需要安裝 Laravel-4-Generators.

安裝 LaravelGenerator SublimeText Plugin

在 SublimeText 中:

Command + Shift + p

出現提示後然後輸入:

install 選擇 Package Control: Install Package

接著輸入: LaravelGenerator 選擇我們要安裝的 Plugin

這樣我們就已經把 LaravelGenerator Plugin 裝進 SublimeText 了

安裝 Laravel-4-Generators Package

開啟專案根目錄下的 composer.json, 在 require 設定加入 "way/generators": "dev-master"

更新並下載所需的 packages

$ composer update

加入 Laravel 的 ServiceProvider

開啟 app/config/app.php

providers 中加上 'Way\Generators\GeneratorsServiceProvider', 讓 artisan 運行時自動載入所需的類別

檢查 Laravel-4-Generators 是否安裝成功

$ php artisan

如果出現訊息有包含以下資訊就代表 package 安裝成功了:

可以參考 Pro Workflow in Laravel and Sublime Text 中的影片教學.

設定

儲存區目錄權限設定

app/storage 這個資料夾裡所有文件和目錄都設為可寫入的權限:

$ chmod -R 777 ./app/storage/

在 Server 上因為我習慣上會把網站文件的群組設為 apache (CentOS) or www-data (Ubuntu), 再付予群組的寫入權限.

$ chown -R user:group ./app/storage
$ chmod -R g+x ./app/storage

環境設定

Laravel 的設定檔都統一放置在 app/config/ 裡, 而 Laravel 可以依據 HTTP host 來決定讀取不同的設定檔, 例如測試主機和正式主機的資料庫設定可能會有所不同.

設定檔預設就是用在 production 環境, 如果有特定的設定需要在 localhost 本機環境下作變動, 只要在 app/config/ 建立一個 local 資料夾, 並把設定檔放置其中即可, 例如 database.php.

example:

app/config/ - 放置正式上線的 production 設定
app/config/local/ - 放置本機環境的設定
app/config/testing/ - Unit Testing 用的設定

環境的定義請見 /bootstrap/start.php

Laravel 已經事先幫你定義好 local 的環境定義, 所以你只需把 your-machine-name 置換成你的電腦名稱或是 localhost.

Encryption Key

在編寫任何程式之前, 請先修改 app/config/app.phpkey (Encryption Key).

你也可以用 artisan 自動產生一組隨機文字的 key, 在這之前需要先將原本的 key 刪除:

接著在 Terminal 下達:

$ php artisan key:generate

« Previous PageNext Page »
(c) 2025 Starck Lin | powered by WordPress