»

Modern Testing with Laravel 4

Coding, Log — Tags: , , — Posted by Starck on June 18, 2013


Behavior-Driven Development

簡稱 BDD, 簡單地說就是用一種情境設定的方式來進行開發的過程。

在 Laravel 4 我們需要以下三種組合之一:


Codeception Installation

# 下載 codecept
$ wget http://codeception.com/codecept.phar
# 初始化 codecept, 它會建立所需的檔案在目前的目錄中的 tests 資料夾
$ php codecept.phar bootstrap

查看有什麼指令可以使用:

php codecept.phar

修改 tests/functional.suite.yml:

因為我們新增了一個 Laravel4 的 module, 所以讓 Codeception 再次重新建立所需的 Class:

php codecept.phar build


Codeception Usage

建立第一個測試:

php codecept.phar generate:cept acceptance Fisrt

Codeception 會在 tests/acceptance/ 下建立一個 FirstCept.php 檔案

內容為:


First Scenario

  • 我要到 / (網站首頁)。
  • 我看到了 Hello World! 這段文字出現在首頁上。

這樣的情境,寫成測試檔就變成如下:

執行測試:

php codecept.phar run


Zombie.JS and Mink

由於 Codeception 的 PhpBrowser 是基於 PHP Curl 去實現模擬 Browser 的操作, 所以面對一些會有 Javascript 互動的網頁,在測試上就會顯得力不從心。還好 Codeception 提供了 ZombieJS module, 我們可以得到一個更真實的模擬測試。

Zombie.JS

Zombie.JS 是一個 NPM 的 package, 所以在這之前我們必須先安裝好 NPM 的環境。

將 zombie 1.4.1 版安裝到全域環境:

sudo npm install -g [email protected]

2013-06-18 註: 經測試, 目前只能裝 1.4.1 的版本, 版本太新 Mink 不支援.

開啟 ~/.bashrc, 加上 NODE_PATH 的設定

export NODE_PATH="/usr/local/lib/node_modules"

Mink

composer.json 中加入到 require:

"behat/mink": "1.5.*@dev"

重新更新 composer:

composer update

目前已知問題: checkOption(), uncheckOption(), executeJs() 無作用


Selenium2 and PhantomJS

比起 Zombie.JS, 我更喜歡 PhantomJS, 更穩定且資源豐富. 主要看到官方的一些範例, 真得相當地強大, 甚至可以 Screenshot… (Codeception 用來當發生測試失敗時會將快照存在 log 資料夾, 相當地方便!)

要使用 PhantomJS 當作 Browser, 我們需要 Selenium2 作 driver.

先執行 Selenium2:

java -jar selenium-server-standalone-2.33.0.jar

將會啟動一個 Selenium2 Server, 預設會使用 port 4444, 如需修改可在後面加上 -port 參數:

java -jar selenium-server-standalone-2.33.0.jar -port 8888

08:17:34.571 INFO - Java: Apple Inc. 20.45-b01-451
08:17:34.572 INFO - OS: Mac OS X 10.7.5 x86_64
08:17:34.584 INFO - v2.33.0, with Core v2.33.0. Built from revision 4e90c97
08:17:34.691 INFO - RemoteWebDriver instances should connect to: http://127.0.0.1:4444/wd/hub
08:17:34.692 INFO - Version Jetty/5.1.x
08:17:34.692 INFO - Started HttpContext[/selenium-server/driver,/selenium-server/driver]
08:17:34.693 INFO - Started HttpContext[/selenium-server,/selenium-server]
08:17:34.693 INFO - Started HttpContext[/,/]
08:17:34.738 INFO - Started org.openqa.jetty.jetty.servlet.ServletHandler@56d73c7a
08:17:34.738 INFO - Started HttpContext[/wd,/wd]
08:17:34.746 INFO - Started SocketListener on 0.0.0.0:4444
08:17:34.746 INFO - Started org.openqa.jetty.jetty.Server@54cbf30e

接著啟動 PhantomJS 跟 Selenium2 連接:

phantomjs --webdriver=4444

PhantomJS is launching GhostDriver...
[INFO  - 2013-06-18T00:17:27.627Z] GhostDriver - Main - running on port 4444

然後設定 Codeception 的 tests/acceptance.suite.yml 設定檔, 指定用 Selenium2 module:

  • url (required) – start url for your app
  • browser (required) – browser that would be launched
  • host – Selenium server host (localhost by default)
  • port – Selenium server port (4444 by default)
  • delay – To set delay between actions in milliseconds (1/1000 of second) if they run too fast
  • capabilities – To set Selenium2 desired capabilities. Should be a key-value array.
Laravel 4 – Resources

Coding — Tags: , — Posted by Starck on June 14, 2013

Starter

Package

IDE helper

PHP – passthru with output buffering

Coding — Tags: — Posted by Starck on June 7, 2013

將 passthru 輸出內容存在變數中:

Laravel – Inject inline content into a section.

Coding — Tags: , — Posted by Starck on June 7, 2013

手動注入 section 內容:

layouts/scaffold.blade.php:

Laravel with Gmail

Coding — Tags: , — Posted by Starck on June 6, 2013

修改 app/config/mail.php:

  • host 為 smtp.gmail.com
  • port 為 465
  • encryption 為 ssl

Test:

Media Query for different Device or Screen

Coding — Tags: , — Posted by Starck on May 17, 2013

from Media Query Builder

Viewing Chrome Cache

Coding — Tags: , — Posted by Starck on May 14, 2013

  1. In Chrome chrome://cache/

  2. Click on whichever file you want to view

  3. Settings > Tools > JavaScript Console

  4. Paste code below:

Git Deployment Solution

Coding, Log — Tags: , , , , — Posted by Starck on April 2, 2013

Why we need a Git Deployment Solution ?

In our past website develop workflow, we may often update files to production server by FTP, but it maybe causes some problems due to human factors, and it can’t be controlled and tracked for file version. As we increasingly need to maintain our projects by Git, if we are able to update server files while we do Git push, it sounds like a good idea, right? so we dont need to check which files want to upload any more. even we can push our project to development server and production server according to our needs.

在以往網站建置的工作流程中, 我們可能常常是用 FTP 的方式來更新 production server 的檔案. 這之中, 常會發生一些人為因素的失誤造成混亂, 而且也沒有一個紀錄來追蹤檔案的版本情況. 現在的工作愈來愈需要 Git 來維護專案, 而如果我們在每次 Git push 的時候, 也更動 server 的檔案, 似乎是個不錯的 idea? (我們不再需要用 FTP 自已判斷要上傳哪些有被異動過的檔案了!) 甚至我們可以先在本機測完, Git push 到 development server, 沒問題後, 再正式發佈到 production server 上線.

聽起來好像不錯? 那該怎麼作?

需要的工具

  • Git
  • 一台已經設好 SSH-Server 的主機 ex: production.com

設定流程

假設我們現在是這個情況:

  • 伺服器的 domain name 叫 production.com
  • 伺服器網站的根目錄設在 /var/www/production.com
本機端 (local)
mkdir "your project folder"
cd "your project folder"
# 建立 git 檔案庫
git init
# create release branch
git branch master
git checkout master
git remote add prod-server [email protected]:/var/www/production.com
伺服器端 (production server)
cd /var/www/production.com
git init
git config receive.denyCurrentBranch ignore
git branch master
git checkout master

我們需要用到 Git post-receive hook 來實現當收到 push 資料之後更新到最後版本:

vim .git/hooks/post-receive

將以下 script 內容加上去

別忘了讓 post-receive 是可被執行的:

chmod +x .git/hooks/post-receive

實作流程

本機端 (local)

我們先建立一個 README.md, 然後用 Git push 看看是否伺服器上也會同步:

Git 會用 SSH 的方式連線, 所以請先確認是否能用該 user 連線登入 production server.

如果想要之後只打 git push 就佈署到主機, 請加上 -u 參數 git push -u prod-server master

伺服器端 (production server)

確認 README.md 存在, 成功!

現在, 我們現在有一個比 FTP 上傳更聰明的佈署方式了.

2013-04-03 update: 今天在找資料的時候發現 Stack Overflow 有人在討論這個方式.

Stack Overflow: Deploying a Project using Git Push

.

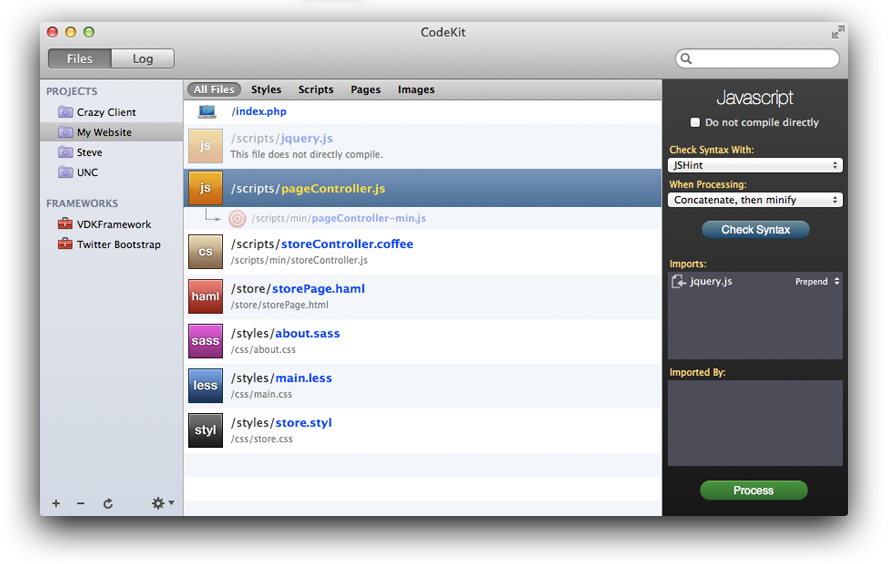
Using CodeKit with Foundation and Bootstrap

Coding — Tags: , , , , — Posted by Starck on March 28, 2013

需要軟體與 Framework

CodeKit

CodeKit Interface

Continue reading “Using CodeKit with Foundation and Bootstrap” »

Laravel 4 Tutorial Part 1 – Installation and Configuration

Coding — Tags: , — Posted by Starck on March 26, 2013

Laravel

根據官網的說法:

Laravel is a clean and classy framework for PHP web development. Freeing you from spaghetti code, Laravel helps you create wonderful applications using simple, expressive syntax.

Development should be a creative experience that you enjoy, not something that is painful. Enjoy the fresh air.

大略看了文件後,覺得跟 Ruby on Rails 的概念很接近,以下幾點特色很吸引我:

  • Artisan : command-line 的操作方式, 支持擴充指令
  • Autoloading : 採用 Composer 的 autoload 機制, 不用再一直忘了 require 了
  • Blade Template Engine : 簡單好用的模版引擎
  • Migration / Seeding : 資料庫的版本管理
  • Query Builder : 幾乎所有的 MVC Framework 都會有這樣的 SQL 操作類
  • Eloquent ORM / Auth : 直接就有 ORM 可以用! 並有一個簡單的 Authentication 機制
  • Dependency Injection
  • IoC Container

安裝

Get Laravel from Github

$ mkdir {project_folder}
$ cd {project_folder}
$ get clone git://github.com/laravel/laravel.git
$ git checkout develop

Laravel 從 4 開始就不再用舊有的 Bundle, 而採用 Composer 來作 packages 的管理與安裝.

下載 Composer

$ curl -sS https://getcomposer.org/installer | php

付予 Composer 可執行的權限

這時專案資料夾會有一個 composer.phar 的文件, 我習慣把它命名為 composer 並付予可執行的權限:

$ chmod +x ./composer.phar
$ mv composer.phar composer

安裝 Composer

$ composer install

安裝 Laravel 所需的 packages

$ composer update

到這裡如果都沒有發生任何錯誤, Laravel 4 就算安裝完成了.

開發工具

我個人偏好用 SublimeText 2 or Vim 來作為我開發的 IDE, 而基於 Laravel 我比較建議用 SublimeText, 因為有一個方便的 LaravelGenerator, 使用這個 Plugin 前需要安裝 Laravel-4-Generators.

安裝 LaravelGenerator SublimeText Plugin

在 SublimeText 中:

Command + Shift + p

出現提示後然後輸入:

install 選擇 Package Control: Install Package

接著輸入: LaravelGenerator 選擇我們要安裝的 Plugin

這樣我們就已經把 LaravelGenerator Plugin 裝進 SublimeText 了

安裝 Laravel-4-Generators Package

開啟專案根目錄下的 composer.json, 在 require 設定加入 "way/generators": "dev-master"

更新並下載所需的 packages

$ composer update

加入 Laravel 的 ServiceProvider

開啟 app/config/app.php

providers 中加上 'Way\Generators\GeneratorsServiceProvider', 讓 artisan 運行時自動載入所需的類別

檢查 Laravel-4-Generators 是否安裝成功

$ php artisan

如果出現訊息有包含以下資訊就代表 package 安裝成功了:

可以參考 Pro Workflow in Laravel and Sublime Text 中的影片教學.

設定

儲存區目錄權限設定

app/storage 這個資料夾裡所有文件和目錄都設為可寫入的權限:

$ chmod -R 777 ./app/storage/

在 Server 上因為我習慣上會把網站文件的群組設為 apache (CentOS) or www-data (Ubuntu), 再付予群組的寫入權限.

$ chown -R user:group ./app/storage
$ chmod -R g+x ./app/storage

環境設定

Laravel 的設定檔都統一放置在 app/config/ 裡, 而 Laravel 可以依據 HTTP host 來決定讀取不同的設定檔, 例如測試主機和正式主機的資料庫設定可能會有所不同.

設定檔預設就是用在 production 環境, 如果有特定的設定需要在 localhost 本機環境下作變動, 只要在 app/config/ 建立一個 local 資料夾, 並把設定檔放置其中即可, 例如 database.php.

example:

app/config/ - 放置正式上線的 production 設定
app/config/local/ - 放置本機環境的設定
app/config/testing/ - Unit Testing 用的設定

環境的定義請見 /bootstrap/start.php

Laravel 已經事先幫你定義好 local 的環境定義, 所以你只需把 your-machine-name 置換成你的電腦名稱或是 localhost.

Encryption Key

在編寫任何程式之前, 請先修改 app/config/app.phpkey (Encryption Key).

你也可以用 artisan 自動產生一組隨機文字的 key, 在這之前需要先將原本的 key 刪除:

接著在 Terminal 下達:

$ php artisan key:generate

« Previous PageNext Page »
(c) 2024 Starck Lin | powered by WordPress